Friday, July 29, 2016

You're in my thoughts...

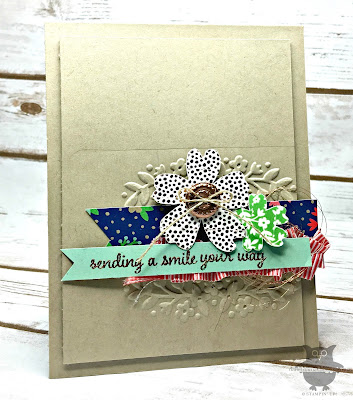
Hello there!  Have you seen the brand new Thoughtful Branches stamp set and coordinating Beautiful Branches thinlits dies?  This gorgeous stamp set is available only while supplies last beginning on August 2nd.  You won't want to miss out!  

My card tonight is a CASE of one that was shared by Stampin' Up!  The card is so gorgeous that I couldn't resist making one of my own.  


As you can see- no trees were used on this card!  This stamp set really is so versatile and is sure to become a go-to set!
Thanks for stopping by!


Thursday, July 28, 2016

Hello!

Good evening stampers!  Tonight I have a quick and easy card to share with you.  This card features the gorgeous roses from the Picture Perfect stamp set.  For those of you who do not know- the roses are created via a 3 step process.  The individual stamps are numbered on the backing sheet so that you know which image to stamp first.  I always start with the lightest color and work my way up to the darkest.


Wondering what set the leaves belong to?  They can be found in the Kinda Eclectic stamp set.  Aren't they lovely?


Monday, July 25, 2016

Love You Lots!

Hey stampers!  I'm so excited to share my card with you tonight.  I knew when I saw the Love You Lots Hostess stamp set that I had to have it!  It's super cute images and sweet sentiments make it the perfect stamp set for many occasions! 

Look at this adorable card I created!  So sweet!  


This is also a CAS card!  It's a great card for both new and experienced stampers!  
Thanks for stopping by!


Sunday, July 24, 2016

Monday Montage #74


Hello there and welcome back for the bi-weekly Monday Montage blog hop. I'm so happy you joined us!  Be sure to visit all of the stops to see what other fabulous projects we have created to share with you.

Tonight I have a gorgeous card to share with you created using the Wherever You Go stamp set.  I totally adore this set!  When I sat down to create, I started making a card with the sun rays and the bridge.  But then I thought- why make something the same as everyone else?  Do something different!  So that's exactly what I did- I made something different!


No bridge here but I did keep the sun rays!  Only I turned them upside down!  I then added other layers for texture as well as dimension.  The Pool Party ribbon was sewed onto the card with random gathering.

Thanks for stopping by!


Thursday, July 21, 2016

Fuzzy Wuzzy was a.....

Hey stampers!  Do you remember the Fluffy Flamingo from a few weeks ago?  Well tonight I'm going to introduce you to another fluffy...only this one we shall call "fuzzy".  Meet fuzzy Baby Bear. 


Isn't he adorable?  I must admit- fuzzy Baby Bear was a tad bit more challenging but overall he still turned out cute!  I used Crumb Cake for the body and Early Espresso for the accents.  All together- it took approximately 80-100 of the smallest flowers from the Blossom Builder Punch to create all the fuzzies.  

Thanks for stopping by!


Tuesday, July 19, 2016

Love and Affection

Good morning stampers!  Have you noticed the gorgeous Copper Stampin' Emboss powder in the new Annual Catalog?  If not- let me just say- OMG!  It is truly a must have!  It's simply beautiful!
Can  you see how I embossed the Classy Button in the center of the flower?  The button turned out so shiny and really adds that special touch to this card.  


Here's a close-up of the button.  


It's so easy to create your own metallic buttons!  Simply choose your button size, smoosh the button onto the VersaMark Ink Pad, dip the button into your choice of embossing powder and heat with the heat tool!  It's that simple!  Be sure to let the button cool completely before you touch it.  It gets super HOT!  Here's another tip:  Use your Paper Snips to hold onto the button!  I stick the paper snips right in the button holes!  Makes it a breeze to both dip and heat your button!

Thanks for stopping by!


Saturday, July 16, 2016

With Sympathy

Good morning!  Today I have a CAS card to share.  Even though I LOVE lots of details on my cards it's sometimes nice to have less.  This card is the perfect example!  


First I cut two layers.  The smaller layer was centered on top of the large layer.   Then I inked up the rose image from the Rose Wonder stamp set and stamped it in the upper left corner of the card so that it overlapped onto both layers.  Next I inked the leaves image and stamped it in the bottom right of the smaller layer so that it overlapped to the larger layer. Using a Blender Pen I added color only to the images that were on the smaller layer.  The sentiment was stamped and the stitching was added.  The smaller layer was popped up with Stampin' Dimensionals to add depth.


Tuesday, July 12, 2016

Thoughtful Branches

Hello there stampers!  Tonight I have a SNEAK PEEK of a brand new exclusive limited-time bundle from Stampin' Up!.  It's called Thoughtful Branches and it is absolutely GORGEOUS!  This bundle is currently only available to demonstrators as a pre-order but beginning in August it will be available to everyone.  Trust me when I say you will WANT this bundle!  There is a gorgeous stamp set with 23 images as well as coordinating framelits.  


The tree image above is my favorite from the set.  It is so beautiful! For my card,  I wanted to create an image that would appear more 3 dimensional so I cut out 8 of the trees in Early Espresso card stock and layered them all together.  I used the Fine Tip Glue Pen to apply the glue in random places.  I made sure not to put the glue in the same places on each piece.  This allowed for the layers to some what pull apart from one another and create the fuller effect.  


Isn't it just beautiful?  Definitely a must have set!

Wanna earn a discount on your bundle?  Head on over to my store!  Bonus Days are in full swing!  You will earn $5 for every $50 spent!  Bonus Days coupons are earned in July and are able to be redeemed in August!


Sunday, July 10, 2016

Monday Montage #73


Hello there and welcome back for the bi-weekly Monday Montage blog hop. I'm so happy you joined us!  Be sure to visit all 10 stops to see what other fabulous projects we have created to share with you.

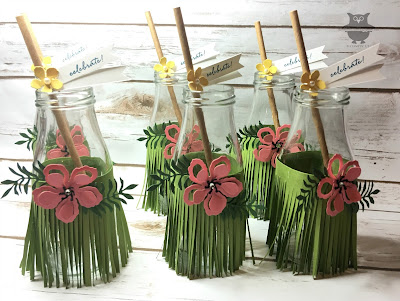
Do you ever go on a Pinterest binge looking for cool things to create?  That's exactly what I did today!  I have a client who is wanting Luau themed party supplies for her luau so I was on a mission!  First up was drink containers.  I found some really cute water bottles with grass skirts on them so I thought why not!  I've got some mini milk bottles that I bet would be uber cute with grass skirts!


At first I wasn't sure how my client would feel about mini milk bottles.  Let alone mini milk bottles with grass skirts.   But as it turns out- she LOVES them!  Mission complete!  The paper straws simply say "celebrate" as the Luau isn't a birthday party or anything like that.  It's simply a celebration of friendships!

This is a picture of all 6:


They really are just too stinking' cute!

Thanks for stopping by!
I hope you enjoyed my project!

 Ingredients:
Card Stock: Garden Green, Old Olive, Flirty Flamingo, Daffodil Delight, Basic Black
Stamps:  Weather Together
Ink:  Island Indigo
Tools/other supplies:  Big Shot, Botanical Builder Framelits Dies, Fringe Scissors, Rhinestone Basic Jewels, Pearl Basic Jewels, Handheld Stapler, paper straws


Sunshine Wishes

Good morning stamping friends!  This beautiful watercolor card was created using the Sunshine Sayings stamp set and coordinating framelits.  I'm totally digging all of the awesome sentiments that this set includes.  They are totally fun and perfect for just about everything!


For the main image on my card I chose the word Sunshine from the Sunshine Wishes Framelits.  The adorable little sketch-like butterflies that come in the set are just too cute!  Before attaching them to my card I curled the wings with a bone folder to help make them appear like they are mid-flight.

Card Ingredients:


Friday, July 8, 2016

Bonus Days!

   Have you heard about the Bonus Days?  What a FANTASTIC opportunity and way to stretch your dollars!  
TH_Social1_BonusDays_demo_July0716_US      
Click the SHOP WITH ME button on the top of the right sidebar to visit my store today!  

 For every $50 USD you spend* between July 7 and July 31, you’ll get a $5 USD Bonus Days coupon that you can use between August 2–31, 2016. 

Thanks for stopping by!


Wednesday, July 6, 2016

Fluffy Flamingo How-To

Good morning stampers!  Do you know what day it is?  It's Wednesday!   The day that I show you all how to create that AWESOME fluffy flamingo!  Are you ready?  What are you waiting for?   Click the video below!  


Would you like to create a fluffy flamingo of your own?  Are you in need of supplies?  Why not head on over to my store!  Just click the SHOP WITH ME button on the top of the right sidebar to visit my online store!  

As always- if you have any questions on how I created something- I am just  an email or phone call away!

Thanks for stopping by!


Supplies needed:
Card Stock:  Flirty Flamingo
Stamps:  Pop of Paradise
Inks:  Flirty Flamingo, Basic Black Marker (to color in the beak)
Tools/other supplies:  Blossom Builder Punch, Simply Scored Scoring Tool (for the stylus), Glue Dots, Stampin' Pierce Mat

Monday, July 4, 2016

Stay TUNED!!!!

Hey stampers!  Over the past few days, I have received SO many emails and questions in regards to the "fluffy flamingo" that I shared in this post that I have decided to create my very FIRST how-to video!  The video will be posted on Wednesday so be sure to come back and check it out! Stay TUNED!!!


Saturday, July 2, 2016

Hello

Hello there!  Did you head out on an adventure for this 4th of July weekend?  Unfortunately we did not.  We chose to take a family vacation later in the year.  That's ok though as staying home meant that I could spend the day at my desk and craft till my heart's content!
While dreaming of an island vacation- this gorgeous vision popped into my head!  I had left the flamingo as a solid stamped image but then I thought why not bring it to life!  Give the guy some feathers!  


Ok so they're not really feathers but it IS texture and it looks AWESOME!  Here's a close up so you can see what I mean.  


How did I do this you ask?  Easy peasy!  I simply punched about 15-20 of the smallest flower from the Blossom Builder punch.  Then I used the stylus from the Simply Scored Scoring Tool and the Stampin' Pierce mat to distress the flowers.  I started in the center of the flower and with the stylus I began making a circular motion.  This in turn made the little flowers curl.  Next I simply folded the flowers up, added a glue dot and stuck it to the flamingo.  Viola!  Easy peasy!  
Thanks for stopping by!

Card Ingredients:
Card Stock:  Whisper White Thick, Basic Black, Flirty Flamingo, Pool Party
Stamps:  Pop of Paradise
Inks:  Flirty Flamingo, Basic Black, Emerald Envy, Peekaboo Peach
Tools/other supplies:  Gold Foil Sheets, Gold Sequin Trim, Gold Metallic Thread, Blossom Builder Punch, Simply Scored Scoring Tool (stylus), Stampin' Pierce Mat, Banner Triple Punch, Heat Tool, Gold Stampin' Emboss Powder, 1-3/8" Circle Punch