Sunday, April 30, 2017

Monday Montage #92 Wood Words SNEAK PEEK!


Hello there and welcome back for the bi-weekly Monday Montage blog hop. I'm so happy you joined us!  Be sure to visit all 10 stops to see what other amazing designers have created to share with you.


Oh my goodness!  It feels like we haven't hopped in forever!  Tonight we're back and we have some fabulous new projects to share with you!

My project tonight was created using the Brand New stamp set called Wood Words. (Sorry!  Not available yet....)  Let me start out by saying that you will LOVE this new set!  Not only does it coordinate perfectly with a little wooden crate but it's perfect to be used on it's own!


To create this card, I began by masking each side of the Whisper White layer leaving a 1/2" white border.  Next, I inked the floral image from the Wood Words stamp set in Basic Black Archival Ink and stamped it into the 1/2" white space border.  After all four sides were stamped, I inked the floral image again and stamped it directly in the middle of the card layer. 


Three hearts were cut out using the Wooden Crate Framelits and layered upon a piece of Gold Glimmer Paper and a bit of Black Metallic Thread.  You may notice that the hearts look a bit wonky.  That's ok- it's how I intended them to be!


The sentiment was then added one layer at a time.  Using the Stamp-a-ma-jig as a guide, I stamped my sentiment first in Berry Burst ink.  Then using the Stamp-a-ma-jig again I lined up the the sentiment one last time.  Only this time- the congratulations sentiment was only partially inked with VersaMark ink and stamped directly over the Berry Burst sentiment.
Gold Stampin' Emboss powder was sprinkled over the sentiment.  The excess was tapped off and then heated to reveal a gorgeous multicolor sentiment.  


I hope that you have enjoyed my SNEAK PEEK of the new Wood Words stamp set!  Would you like a brand new 2017-2018 Annual Catalog of your own?  Message me and I will send one to you as soon as they become available!

SUPPLIES NOT CURRENTLY AVAILABLE:
BERRY BURST CARD STOCK
BERRY BURST INK
WOOD WORDS
  Click the NEXT button to go to the fabulous Dara Gloden or click the BACK button to head on over to the lovely Cathy Casey.


Monday, April 24, 2017

Birthday Delivery Sneak Peek

Hello there!  A few weeks ago I went to Richmond, VA for the Stampin' UP! OnStage Local event.  At this event demonstrators were given the opportunity to see the NEW upcoming Annual Catalog, stamp with new products, see gorgeous display boards, enjoy stamping demonstrations and have a great time with friends!  

One of my favorite parts of OnStage was getting to use the brand new Birthday Memories product suite for one of the make and takes.  I think this has got to be my absolute favorite suite in the new catalog.  There are TONS of absolutely amazing suites but the Birthday Delivery suite really stands out above all the rest.  It's fun, colorful and the images remind me of things from my childhood.  Like Golden Books!  


Did I mention that this suite has framelits that coordinate perfectly with the stamps AND the DSP?  Yep- that's right!  The framelits coordinate with the DSP!  How awesome is that?  
On my card above, I used the largest oval from the Layering Ovals Collection  to cut out the cupcake image.  The adorable little girl was cut from a piece of DSP/Birthday Friends framelits and popped up with Stampin' Dimensionals.  She's just too cute!  


And...how about that gorgeous ribbon?  It's also brand new!  It is 1/4" Stitched Edge Ribbon and it will be coming in your choice of 4 colors- Rich Razzleberry, Pacific Point, Old Olive and Pumpkin Pie.  The base ribbon is white and it has colored stitching along each edge of the ribbon.  It is FAB!


Supplies:
Card Stock:  Whisper White, Crumb Cake, Pacific Point, Blushing Bride, Real Red
Ink:  Pacific Point
Tools:  Big Shot, Paper Snips, Stampin' Dimensionals, Layering Ovals Collection Framelits, Lace Doilies

Supplies not currently available:
Stamps:  Birthday Delivery
Paper:  Birthday Memories DSP
Tools:  Birthday Friends Framelits, 1/4" Stitched Edge Ribbon in Pacific Point

Friday, April 21, 2017

Stampin' Up! Artisan Design Team Blog Hop - Display Stamper Day 8


Hello there!  Welcome back to day 8 of the Stampin' Up! Artisan Design Team Display Stamper blog hop.  I'm so happy you've joined us!  As we are sharing our beautiful Display Stamper projects from all around the world- please be sure to download Google Translate so you don't miss out on any of the fabulous details!

I think the projects I'm sharing today are some of my favorites.  ♥  There is just something so magical about the Tranquil Tulips set that I just cannot resist.  For the purposes of the Display Boards at OnStage- I chose to create all of my tulips (on every tulip project) in either Fresh Fig or Berry Burst.  I wanted to showcase the new In-Color's as much as I possibly could.
My projects today are no exception!


I love how different the tulips look with just a simple change in stamping.  To create the tulips on the Petite Cafe Gift Bag- I inked them up in Berry Burst ink and stamped them off onto a scrap piece of paper before I stamped them on my tag.  


To make the tulips 3 dimensional- I stamped several of them onto scrap pieces of card stock and cut different pieces out to make them look real.


For my card, I used a Berry Burst base with a Lemon Lime Twist layer.


 Here's a close up of the tulips.  These were stamped full strength Berry Burst.


This is a closeup of the sentiment.  It was created on a Whisper White banner and rolled on one end.  A Pool Party Baker's Twine bow completes the card.  


I hope you have enjoyed my projects for today!  Be sure to check back tomorrow for more beautiful Display Stamper samples!  Thanks for stopping by!

Be sure to click the button below to see what the absolutely fabulous Jessica Winter has created for her display samples.  


Dani Dziama  YOU ARE HERE


Thursday, April 20, 2017

Stampin' UP! Artisan Design Team Blog Hop- Oh So Succulent Gift Set

Hey there!  Welcome back to another Stampin' UP! Artisan Design Team Blog hop!  If you are hopping with us today then you may have arrived here from the fabulous Cathy Caines.  Isn't she amazing? As we are a group of 20 demonstrators from around the world- our blogs are written in many different languages.  Please be sure to use Google Translate so that you can follow along in your language.  You don't wanna miss out on any of the fabulous details!

For our hop today I'm featuring the Oh So Succulent stamp set and coordinating framelits.  I love the versatility of this stamp set.  From greeting cards to home decor this set has you covered!


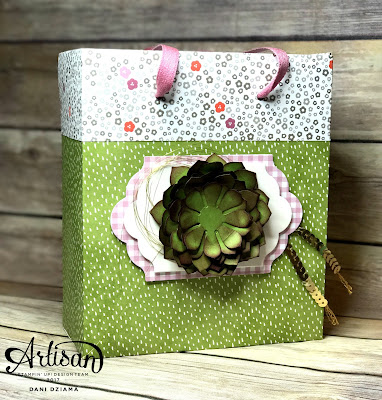
 I created an adorable picture frame complete with a succulent picture and a gift bag. This gift bag was created using 2 sheets of 12" x 12" Succulent Garden DSP.  The handles were created using the fabulous 3/8" Succulent Garden Ribbon Combo Pack.


To me- this gift bag is the ideal size.  When completed it measures 6" long x 3" wide x 7" high.  The base has a piece of card stock for reinforcement.  


To create the succulent accent piece I cut several different sized succulent pieces from Old Olive card stock.  All succulent petals were sponged in Rich Razzleberry ink to add texture.  As you can see in the picture above- some petals were inked more heavily than others.  Since I was trying to go for a more natural look- each petal that was sponged was sponged differently with the darkness of the ink.  


I created a faux wooden frame from a sheet of 12" x 12" Soft Suede card stock.  Using the Hardwood background stamp added the look of a real wood texture.


The succulent picture was created using Succulent Garden DSP and several different succulents that were all stamped onto Shimmer White card stock and watercolored.  After they were dry I painted each piece with Clear Wink of Stella for an added shimmer touch.  Since I needed a "flower pot" to hold the succulents- I decided to use the ice cream bowl from the Frozen Treats Framelits Dies.

Thanks for stopping by!  I hope you will continue on your journey to the wonderful Holly Stene!  I KNOW she has something amazing to share!


Supplies: Also used were the Lots of Labels Framelits.

Wednesday, April 19, 2017

Stampin' UP! Artisan Design Team Blog Hop- Display Stamper Day 7


Hello there!  Welcome back to day 7 of the Stampin' Up! Artisan Design Team Display Stamper blog hop.  I'm so happy you've joined us!  As we are sharing our beautiful Display Stamper projects from all around the world- please be sure to download Google Translate so you don't miss out on any of the fabulous details!

I can't believe it's day 7 already of this fabulous blog hop.  I still have SO many samples to share!  I'm happy to say that I'll still be able to have several extra days worth of projects!  I hope that you will continue to visit and check them out!

Today I'm sharing several cards created with the At Home With You stamp set.  This set is super fun and I'm so happy that there are coordinating framelits that will be available when the new catalog is released.  I fussy cut each and every single coordinating piece.


As you can see in the picture the door on this card is open.  Why?  Because that's where the sentiment is!  Yep!  That's right!  There's a sentiment that fits perfectly behind the door!  How's that for a FUN card?


My next 2 cards are pretty much the same.  The only difference is the sentiment and embellishments. 


I like that there are different options to decorate the door and the area around the door.  


I used the Watercolor Pencils and an Aqua Painter to color the images on 2 out of 3 cards.  The middle card features the new Berry Burst card stock and ink.  The door on that card was watercolored using the ink pad and Aqua Painter.


I hope you have enjoyed my projects for today!  Be sure to check back tomorrow for more beautiful Display Stamper samples!  Thanks for stopping by!

Be sure to click the button below to see what the absolutely fabulous Jessica Winter has created for her display samples.  


Dani Dziama  YOU ARE HERE


Tuesday, April 18, 2017

Stampin' UP! Artisan Design Team Blog Hop- Display Stamper Day 6


Hello there!  Welcome back to day 6 of the Stampin' Up! Artisan Design Team Display Stamper blog hop.  I'm so happy you've joined us!  As we are sharing our beautiful Display Stamper projects from all around the world- please be sure to download Google Translate so you don't miss out on any of the fabulous details!

My project tonight features a few of the new shapes from the Lovely Laurel Thinlits Dies.  These dies are beautiful!  For this card- I chose to use the leaf and labels images.  The label was embossed with the Happy Heart Textured Impressions Embossing Folder and the leaves were cut out of Gold Glimmer Paper.


The Bundle of Love Specialty DSP also coordinates perfectly with this card.  I used a piece of Blushing Bride Bundle of Love Specialty DSP for one banner and the other banner I used the gold chevron side.  To create the sentiment banner- the sentiment was stamped first in Blushing Bride ink onto the Very Vanilla banner.  Then I re-inked only the bottom portion of the sentiment in Versamark ink.  I used the Stamp-a-ma-jig to line the sentiment back up and stamped the one with Versamark Ink directly over the Blushing Bride sentiment. Using Gold Stampin' Emboss Powder and the Heat Tool- half of the sentiment was embossed.


I hope you have enjoyed my projects for today!  Be sure to check back tomorrow for more beautiful Display Stamper samples!  Thanks for stopping by!

Be sure to click the button below to see what the absolutely fabulous Jessica Winter has created for her display samples.  


Dani Dziama  YOU ARE HERE


Monday, April 17, 2017

Stamping UP! Artisan Design Team Blog Hop- Display Stamper Day 5


Hello there!  Welcome back to day 5 of the Stampin' Up! Artisan Design Team Display Stamper blog hop.  I'm so happy you've joined us!  As we are sharing our beautiful Display Stamper projects from all around the world- please be sure to download Google Translate so you don't miss out on any of the fabulous details!

My projects for today are so sweet.  ❤  They feature the brand new Bundle of Love Specialty Designer Series Paper.  Earlier in the hop, I shared a few samples that were created using this DSP as well however those samples were using Blushing Bride.  My samples today feature the Soft Sky/Vanilla paper.


This paper is perfect for so many occasions.  Especially for baby!  It coordinates so well with the Moon Baby stamp set and various gold embellishments.  As I wanted the moon to be the main focal point on this card, I used the Daffodil Delight re-inker and an Aquapainter to watercolor it in.  I wanted it bold and bright and that's just how it came out!


As you can see in the close up- this card has many different layers.  Lots of texture and dimension help make this card so sweet and oh so fun!  The moon and the baby outfit were also colored in with the Clear Wink of Stella.  It's a little difficult to see in the picture but they are super sparkly.


The second part of this set is an adorable little favor box that would be perfect for a baby shower.  Once again- I've used the Moon Baby stamp set and the Bundle of Love Specialty DSP.


To create the umbrella- I stamped the baby/umbrella image onto a coordinating piece of the Bundle of Love Specialty DSP and a Shimmer White scrap.  Next, I fussy cut the umbrella.  The umbrella was then adhered over the top of  the baby/balloon image that was stamped onto Shimmer White card stock.  


The picture above shows the top view of the box.  It's really cute in person and super simple to create!  As the box needed to be light enough to adhere to the display board with velcro dots- I could only fill it with paper shred.  It however would be adorable filled with baby themed candies.

I hope you have enjoyed my projects for today!  Be sure to check back tomorrow for more beautiful Display Stamper samples!  

Be sure to click the button below to see what the absolutely fabulous Jessica Winter has created for her display samples.  


Dani Dziama  YOU ARE HERE


Sunday, April 16, 2017

Stampin' UP! Artisan Design Team Blog Hop- Display Stamper Day 4


Hello there!  Welcome back to day 4 of the Stampin' Up! Artisan Design Team Display Stamper blog hop.  I'm so happy you've joined us!  As we are sharing our beautiful Display Stamper projects from all around the world- please be sure to download Google Translate so you don't miss out on any of the fabulous details!

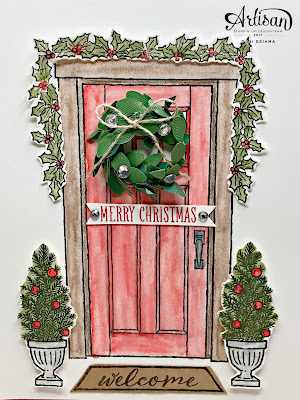
Today I am featuring the brand new stamp set At Home With You.  This stamp set is FABULOUS!  There are so many options!  Upon first glance at this set it may appear as just an ordinary stamp set.  That is so NOT the case!  The main image is a door and let me tell you- that door is pretty amazing!  It can be opened, closed, wood grain, plain, decorated, undecorated and so much more!


As you can see, my door is Christmas themed.  The Boxwood Wreath embellishments are the perfect coordinating option for this stamp set.  They add a 3 dimensional effect which makes the door look more realistic.


See the holly garland and the evergreen potted trees?  I fussy cut them so that they would appear as though they were separate from the door.  But guess what- in the new Annual Catalog there are coordinating framelits so that you won't have to fussy cut like I did!  


I hope you have enjoyed my project for today!  Be sure to check back tomorrow for more beautiful Display Stamper samples!  

Be sure to click the button below to see what the absolutely fabulous Jessica Winter has created for her display samples.  


Dani Dziama  YOU ARE HERE


Saturday, April 15, 2017

Stampin' UP! Artisan Design Team Blog Hop- Display Stamper 3


Hello there!  Welcome back to day 3 of the Stampin' Up! Artisan Design Team Display Stamper blog hop.  I'm so happy you've joined us!  As we are sharing our beautiful Display Stamper projects from all around the world- please be sure to download Google Translate so you don't miss out on any of the fabulous details!
The display sample that I have to share today was a very quick and easy card to create.  This simple yet beautiful card was created using one of the new Boxwood Wreath embellishments from the upcoming Annual Catalog and the Merry Christmas sentiment from the new At Home With You stamp set.


As you can see in the picture below, the Boxwood Wreath embellishments are super cute!  They come in a shape of a wreath but can also be unrolled to create boxwood garland.  I added a few Real Red Enamel Shapes from the Brights Enamel Shapes pack to add some color and make the wreath have more of a Christmas feel.


I hope you have enjoyed my projects for today!  Be sure to check back tomorrow for more beautiful Display Stamper samples!  

Be sure to click the button below to see what the absolutely fabulous Jessica Winter has created for her display samples.  


Kimberly Van Diepen http://stampinbythesea.com/ 
Mercedes Weber http://mypaperparadise.com/ 


Friday, April 14, 2017

Stampin' UP! Artisan Design Team Blog Hop- Display Stamper Day 2

Hello there!  Welcome back to day 2 of the Stampin' Up! Artisan Design Team Display Stamper blog hop.  I'm so happy you've joined us!  As we are sharing our beautiful Display Stamper projects from all around the world- please be sure to download Google Translate so you don't miss out on any of the fabulous details!

The samples I have to share today were all created using the brand new In-Colors and the Tranquil Tulips Hostess stamp set.   For me- this stamp set was love at first sight!  I just knew it would create fabulous cards!


For my project- I created a set of four 3" x 3" cards and an adorable little box to hold them.  Each card is for a different occasion.  This set would make a great little thank you gift!  The picture below is the box that holds the cards.  It's just a simple box with a belly band to hold it closed.


As you can see from the close up pic- the tulips were stamped multiple times and fussy cut in order to make the tulips appear 3 dimensional.  Unfortunately the pictures don't really show just how beautiful these projects are.  All tulips were colored with the Clear Wink of Stella to add a bit of shimmer.


The first card is a pretty simple card.  I sometimes think that less is more so I wanted to keep it simple.  I inked the flower in Berry Burst and stamped it off onto a scrap paper before stamping on my card stock.  This allowed for a lighter shade of Berry Burst.  I then used Berry Burst again only instead of stamping it off- I used it fully inked to add the floral accents.  The centers of the flowers were given some dimension using the Fine Tip Glue Pen.


My second card is one of my favorites!  I embossed the Lemon Lime Twist background with the Softly Falling embossing folder.    Two tulips were stamped onto the Whisper White layer.  Then I stamped another set of tulips and cut them out to make the tulips "pop" off the card.  


As I was looking at the different images in the Tranquil Tulips stamp set- 2 images in particular stood out to me.  The first one was the larger tulip and the other was a set of teeny tiny dots.  The first thing I thought of when I saw them was a butterfly!  So that's exactly what I made!  


The picture below is a close up.  To create the buttterfly- I stamped 2 of the top tulip layer in Pool Party.  Then I stamped the series of 3 dots along the points in the tulips.  Next- I cut the tulips out and layered them together using glue dots.  The dragonfly body from the Dragonfly Dreams stamp set makes the perfect body for the butterfly!
I love how the butterfly landed on the tulip.  So cute!

Last but certainly not least is the 4th card from my set.  I love the pretty Powder Pink blooms!  They pop off the card!  The background was created by stamping the floral accents all over the Fresh Fig card stock in VersaMark ink. 


I hope you have enjoyed my projects for today!  Be sure to check back tomorrow for more beautiful Display Stamper samples!  

Be sure to click the button below to see what the absolutely fabulous Jessica Winter has created for her display samples.  


Kimberly Van Diepen http://stampinbythesea.com/ 
Mercedes Weber http://mypaperparadise.com/